by Linda | May 13, 2015 | my creative journal, Uncategorized
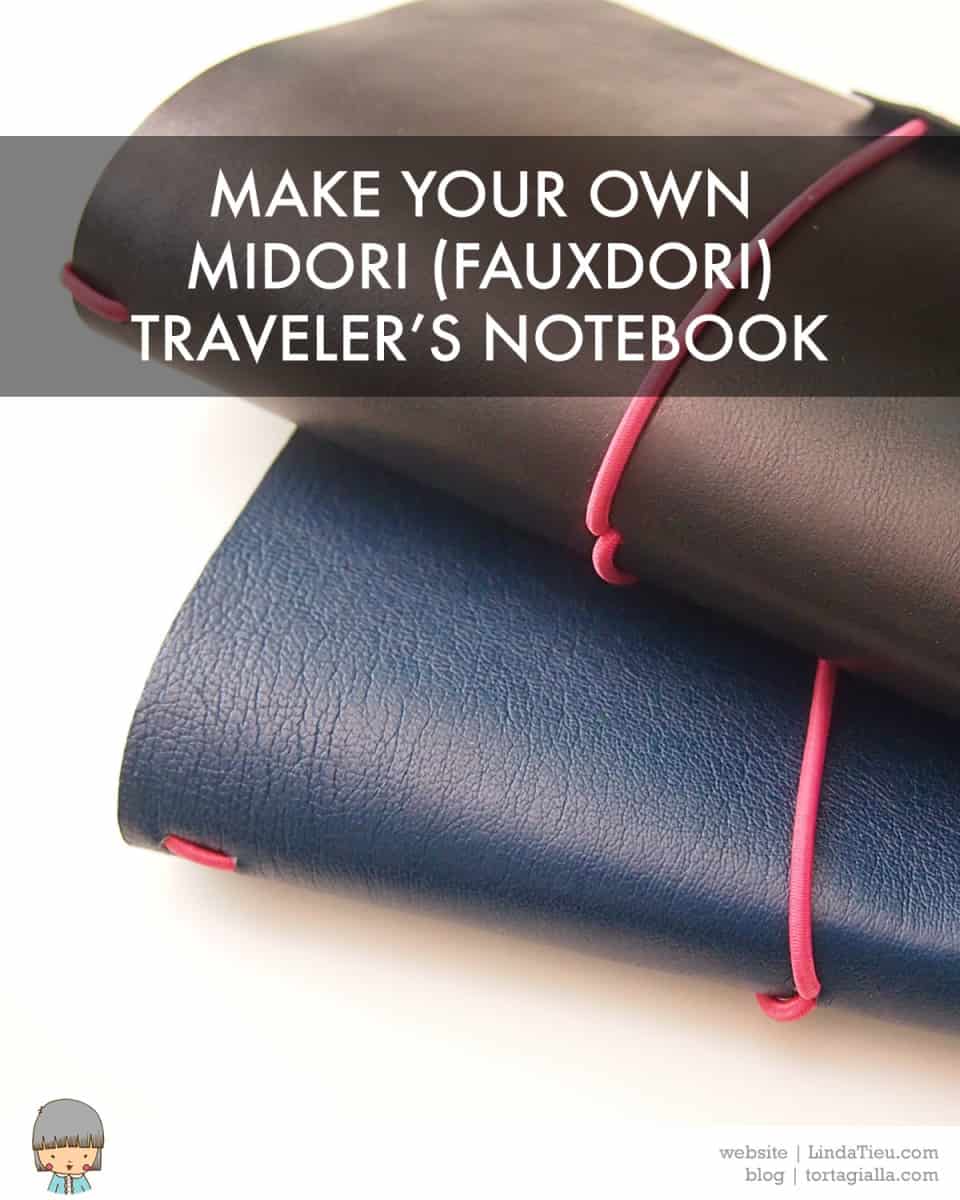
I’ve been looking into paper planners recently and kept seeing the mention of Midori journals and notebook inserts. Although it’s been around for a long time, I never actually understood what it was. The Midori Traveler’s Notebook is basically a leather cover with elastic bands inside that enable you to slip in and out saddle stitched inserts. This means that you can use the same journal cover over and over, just swapping out your notebook insert inside.
Of course, the original brand name is Japanese and not the cheapest on the block. People have copied the idea and often go DIY, calling them fauxdori. Although the Midori was originally intended for travelers who would swap out inserts for every trip, nowadays people use the same idea for all kinds of purposes. Everyday sketchbook artists, planner addicts, list makers, diary writers, bullet list journalers – you name it! The system is so flexible, it’s just a great way to keep a perpetual journal for any topic or hobby.
I decided to jump on the bandwagon and try my hand at making a Midori (fauxdori) Notebook. There are lots of tutorials out there and definitely some variation in regards to sizes and how the elastic band is bound into the cover. But ultimately, all you need is durable material for your cover, the elastic band material and some basic bookbinding tools. All the other details are sort of up to your preference.
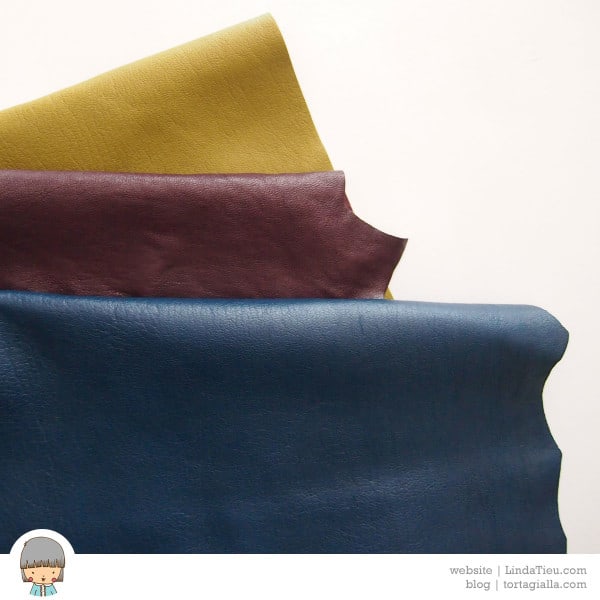
After rummaging in my stash, I decided to use the dark blue leather for my first fauxdori notebook. Unfortunately, the leather is not a very thick and quite floppy. I know that not everyone has access to leather, but you can definitely consider any kind of material that will hold up to be a cover. Whenever I want to strength my cover material, I just cut a piece of cardstock to size and glue it to my leather. Besides adding strength, it’s a nice way to add a pop of color and design to the inside of your journals.
Since I live in Italy and we use A4 paper, I decided to size my notebook accordingly. You can see a bunch of note system page sizes here and decide what you want to go with. Depending how thick and expansive you want the notebook to be, you’ll have to calculate enough width for the spine area. I would have preferred to make mine wider, but I’m limited by the size of the patterned paper that is 30 centimeters wide.
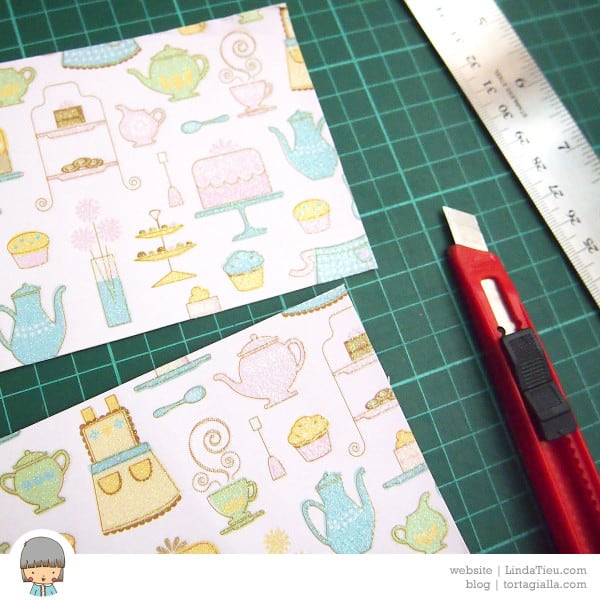
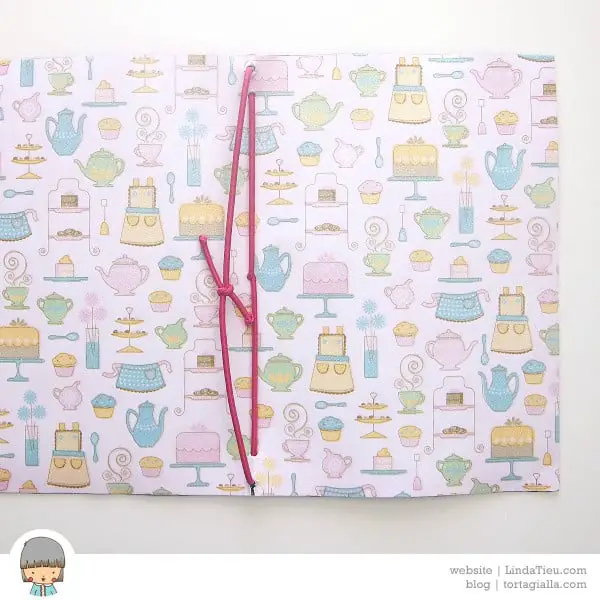
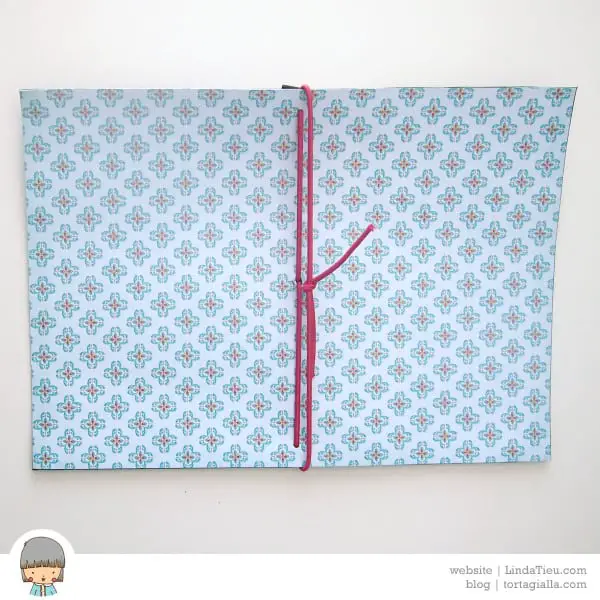
I cut my paper to size first, then glued it to my leather with standard white glue. After everything dried completely, I trimmed my leather to size and made some measurements to punch the holes for the elastic band. I ended up purchasing some colored elastic that you usually see with these types of notebooks – but I didn’t realize 3mm is actually really thick. I think it’s too big because I had to punch really large holes to get it to fit through.
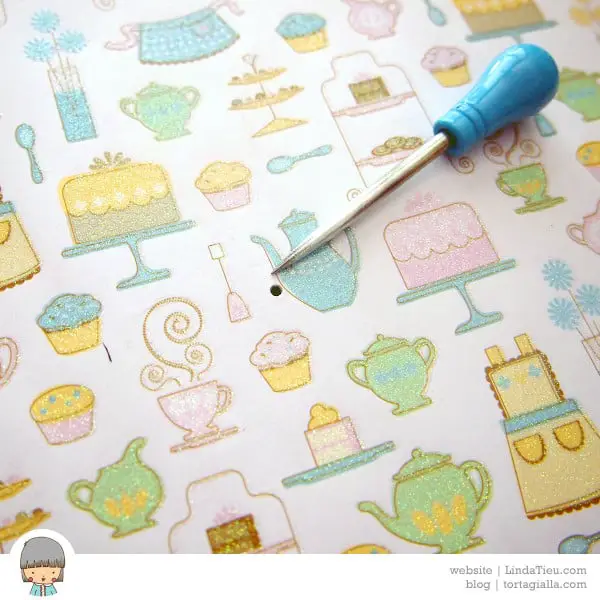
I punched a hole in the middle of the spine for the wrap around part of the elastic. You might have seen that some journals have the closure cord separate and knotted on the back, but I don’t like the idea of having a bump under the writing area of the notebook pages. Now comes the part that tripped me up a bit in the process. I realized that the cover has to be much larger than your notebook insert size from top and bottom, because you have to punch holes for the elastic and the notebook has to slip in. How close did I really want to punch these holes to the edge of the cover? Especially since my cord is so thick, I was risking weakening the whole cover structure and possible tearing through use.
In fact, with all the wrangling I ripped the paper lining at the bottom of the cover as shown in the picture above. Below you can see a view of the finished cover from the outside.
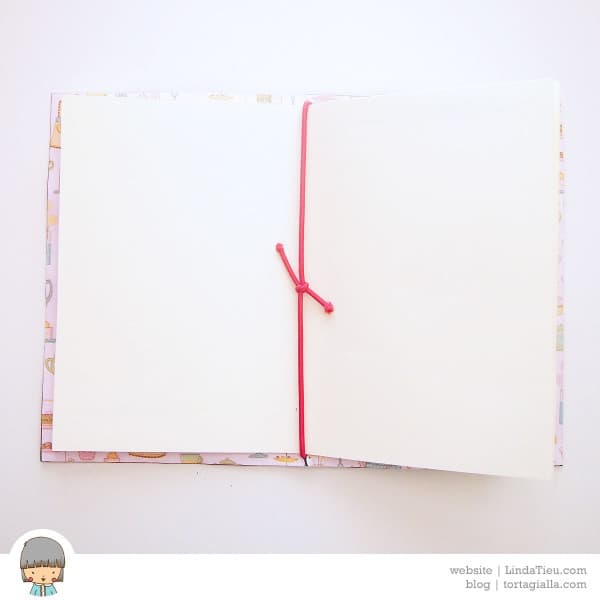
In the end, it wasn’t a total loss, because I just had to cut my notebook insert paper down a 1cm to fit into the cover. I suppose it’s not too shabby for my first try.
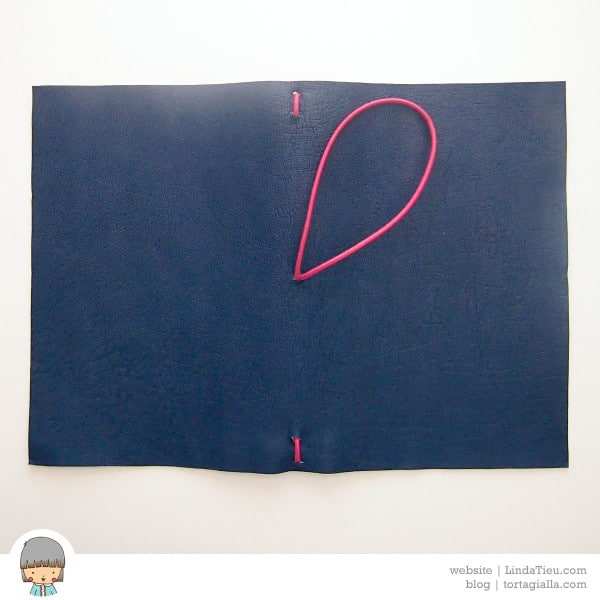
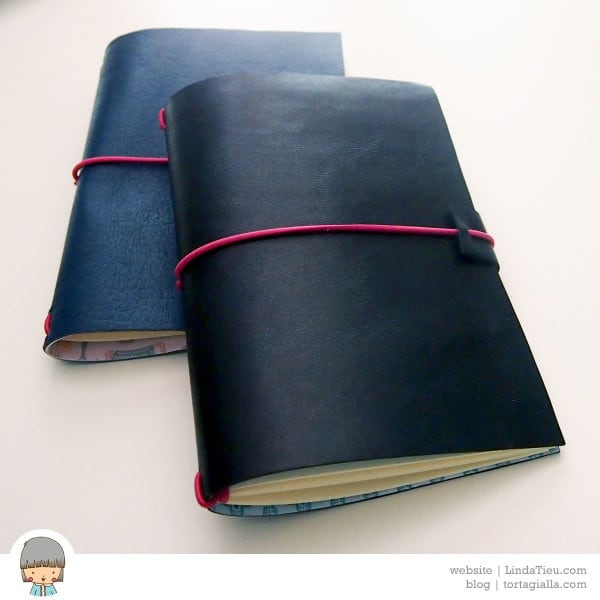
Of course, from the hands-on experience I immediately wanted to make another fauxdori with a few improvements. Instead of punching holes in the cover to string the elastic through – reducing the size of the insert that can slip in, I wanted to try wrapping the elastic over the top and bottom of the cover. Of course, it depends on you having a strong enough cover material to withstand that pressure, so this second attempt uses a heavier weight black leather.
I also added a little strip of leather with the wrap around part of the elastic, so the pressure wouldn’t rough up the notebook papers on contact, when closing it up.

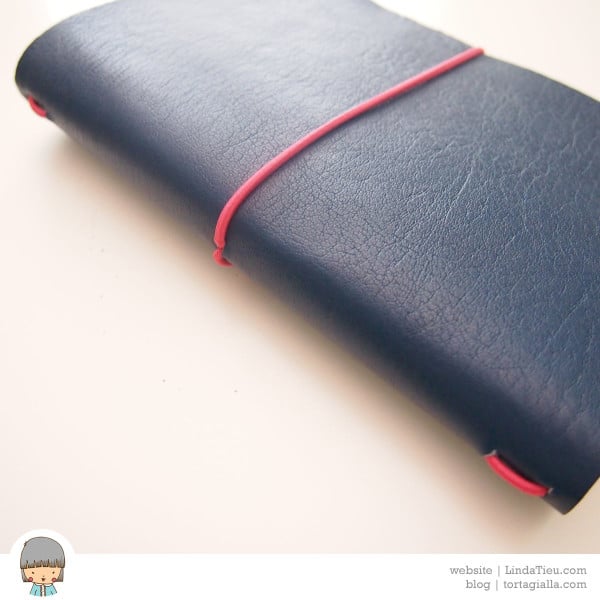
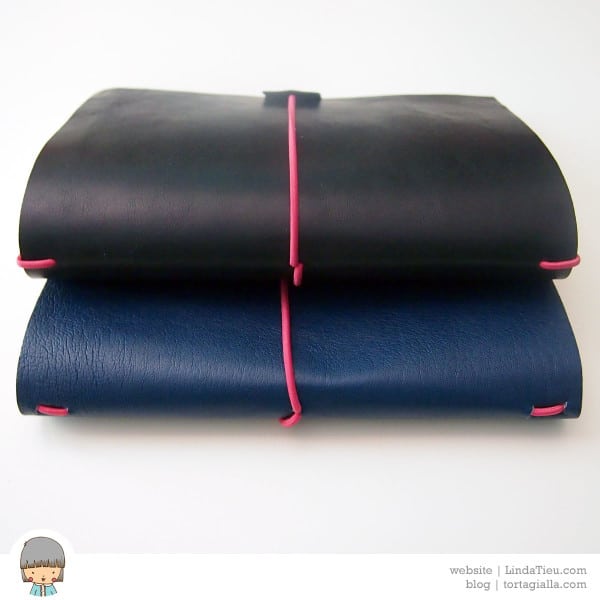
Obviously, all this has to be tested with tried and true usage, to see what really happens. I ended up with two fauxdori covers to test out… perhaps will carry it around in my purse to see how the wear and tear goes.
Coming from a bookbinding perspective, I know there are lots of variations possible in terms of where to punch the holes and how many strands of elastic to include, depending how expansive you want your notebook to be. I’m thinking of horizontal row of holes and needing more width for the cover in general. Or maybe even using slits instead of holes.
Lots to consider and think about… not to mention real-world testing.
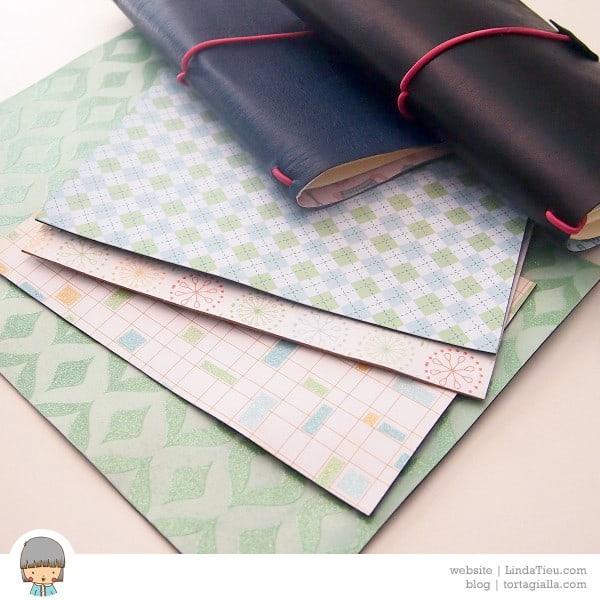
Well, since I have a whole lot of material available, I will be making more of these to try out some variations in construction and sizes for different purposes. I’m thinking that personally I would definitely use this system for notebooks in my purse, because it’s usually quick notes and things I jot down, not necessarily to be kept forever. It seems the kind of usage that makes sense for something that can be perpetually swapped out.
Have you tried to make a fauxdori? Did you run into any issues or would you opt for traditionally binding a journal?
by Linda | Dec 6, 2011 | my creative journal, Uncategorized
Over time I have learned what my favorite tools and materials are for this lovely art called bookbinding. I thought it would be nice to go through what I normally use when binding books and journal. Nothing really fancy here…I think we might all have these items in one form or another. I’m definitely a very DIY small-time bookbinder…

A self-healing cutting mat and cutting knives – definitely must haves in so many ways. I’ve never found a paper trimmer that I love and much prefer a mat and knife. Also, the measurements on the mat itself are very useful for lining up cuts and projects while crafting in general.

A metal ruler – metal means it will last longer and sits heavier on top of paper to prevent sliding while you cut. Love it!

Bone folder – a must for folding paper and smoothing things over. You can also use the tip to score lines in your paper as well…

Awl – for punching holes! I have a pretty small one that sometimes gives me a handache…one of these days I might invest in the Japanese screw hole punches… very cool. Just know that you need a way to pre-punch your holes.

Needles – big tapestry needles work great for sewing up books.

Linen thread – I use both waxed and unwaxed linen thread, because it’s super strong!

PVA glue – Vinavil is the brand we use here in Italy and it’s the same glue even bookbinding teachers at workshops use…so I’m cool with it! Really, just any glue will do.

Junky brushes – to brush on the glue – probably more important than the glue, because if you get a nice coat on, it’ll stick! I use hardware store brushes. If it gets junked up, I just toss them out.


Materials from paper to leather – I use all types of materials, even recycled board to create book covers and fill in the pages of my journals. It’s fun to use alternative materials actually.

Those are pretty much all the tools and materials that I use, so it’s nothing too fancy. Of course there are many other professional tools you can buy, but you certainly don’t need them to make yourself a journal to use!
Hope my list can help you get started in bookbinding and you might also like these bookbinding tutorials I’ve written:
by Linda | Apr 22, 2011 | my creative journal, Uncategorized
When I first started this creative business 101 journey, I wrote a mega outline of “things to do.” Many of the items are straightforward tasks from writing a business plan to getting my website launched. Others however, are much more general such as “marketing and promotion.” It’s easy to say that we need to promote ourselves and get our work out there…but exactly how does one go about it? It’s no surprise that these particular items on my list seem super difficult to approach. I realized that I needed to break out my bullet point of “marketing and promotion” into concrete actionable steps.

So I started to write specific action items that would result in marketing and promotion for me as an artist. I want to introduce myself to design blogs and art blogs, approaching one a week sounds pretty doable. I also have the goal of being published in art magazines, so I decided to submit my work to art calls. I actually scheduled in the due dates for the ones I’m truly interested in. So my efforts are focused on publications and blogs that I read, follow and want to be involved with…not to mention those that would fit my style of artwork. Then there’s the notion of advertising…

Suddenly, I realized I was missing an important tool…where’s my media kit? What exactly am I going to send to people? If you stop and think…just a link to your website or blog makes it extremely difficult for someone new to your work to find focus. They might want a headshot or specifically photos of your most popular or recent collection only. If you customize your materials every single time, this marketing thing is going to swallow up all your time. So it makes sense to have an official kit of materials. Photos, work to promote, blurbs about me…that kind of thing. Simply put, all the materials that might be used to promote you!
Without materials prepared, you run the risk of finding yourself scrambling for materials when there’s a deadline and possibly presenting yourself in a sloppy fashion. I actually experienced something similar in the past, when I bought advertising for my Etsy shop before having an ad. Yeah, it sounds silly but it happens. You finally get attention… but there’s nothing to back it up, so they simply move on. Urgh! What a waste!
So my actionable task item is to create a media kit…although I haven’t decided yet if I want to package it up into a formal Press Kit PDF. Either way, I need to create the parts first. With these thoughts swirling in my head, I then got an email announcing a new ebook by Tara Reed, How to Be a Press Friendly Artist. It’s funny how things seem to coincide miraculously in life. I bought it right away and have spent the last two weeks digesting the material and putting the advice to action. She also just posted on her blog about prepping your press kit.

The ebook goes into a lot of details that I am still thinking through, but it has also triggered a few overarching realizations about presenting my work and myself as an artist. First and foremost, it’s all about making it easy for people to promote you – whether it’s the official press, a fellow blogger, a magazine or an art gallery. When you make things easy for people, they are also more likely to run with it…just the honest truth. Even when I love someone to death, having to jump through lots of hoops when life is crazy busy…just turns me off and I probably won’t get to it in the end. Second realization is that you have to think of what’s of interest to your audience when promoting yourself or your product. What’s the benefit…not just what is it and what does it do. There’s usually always something cool or unique to talk about, a certain angle that makes it more interesting. Not to mean that you should be a poser, but that you have to find the gem that is already there and polish it up. I find it helps to actually ask someone else, because they usually see it differently than you do personally. I realized that my story of moving from California to Italy…really excites people! And it is true that living here in a new culture that is so drastically different from Los Angeles lifestyle…totally changed my outlook on life. My lifestyle certainly inspires my artwork…so I think I should play that up – because it’s inspiring. If I could change my life so drastically, so can you…and I honestly truly wish that we could all live blissfully. Ultimately it is a state of mind…not how many cars you have or how much money is in the bank…or where you live…all those details… anyway… I’m getting off topic now – LOL!

So as I read through the ebook, I realized there’s so much to create and writing does freak me out a bit. It also just feels weird to examine yourself and write about yourself in the third person. At times I feel like I’m tooting my own horn and wondering if I’m doing it all wrong. As with everything in life, new things are scary but we all live and learn, right? I tried to stop fussing over little details and get something done instead. I started writing a press release about my new website and along the way, created a lot of material that can be used for my bio and fact sheet as well. I set up a free newsroom with PRLog.org and put up my first press release. Whew! Less than perfect, but it’s a start and I’m happy to have taken the first step in getting myself out there. I’m learning as I go, by taking action and whether you are just starting or already a pro… there’s always something new to learn and lots of room to grow…

I’m going to take the weekend to finish compiling my bio and faq sheet, which gets me ready to introduce myself to bloggers. So I will be putting my weekly promotion tasks into action after Easter. Finally, there are the photos. I actually have some photos already, those you see in my online profiles. But they work only because they are tiny…I don’t have it for print quality purposes. And even though I really love to take photos, self portraits have never turned out right because my face just doesn’t seem to co-operate at times (see above? that is freakish me!) 🙂 I probably should have asked my photographer friends to help me out when still living in the States! Guess, I’ll have to go at it alone with my trusty Nikon D60. Coincidentally this weekend is Easter. Which means I can kill two birds with one stone…dressing up a bit before our big family luncheon to do a fancy photoshoot for myself. Taking all the tips from the ebook with me, hopefully I’ll have at least one suitable photo next week!
Hope everyone has a lovely Easter holiday and lovely weekend in general. I hope that in sharing my experience, I can inspire others to go chase their creative dreams! It’s taken me some time to get to this point, but I’m so proud of myself for taking action and moving ahead. A little at a time…it works!