by Linda | May 16, 2014 | my creative journal
Looking for easy bookbinding tutorials? A bit of artsy crafty motivation?
For inspiration and instruction combined, here’s a round-up of the most popular bookbinding posts I have shared on the blog.
I’m happy to be able to help you learn and get a bit creative with whatever materials you may have at home. Enjoy!
by Linda | Dec 26, 2012 | my creative journal
Hope you had a lovely holiday with family and friends!
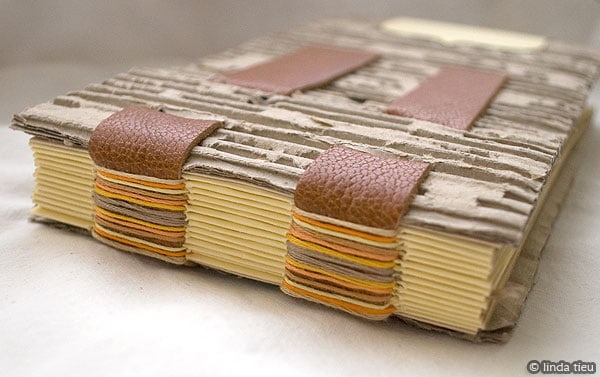
I’ve been trying to clean up my space and found myself tempted to dive into a bit of crafty fun. Nothing like getting your hands into materials to spark inspiration. I noticed that my collection of leather has been building up, so I thought it was about time I used my leather scraps for something. Often a project that uses fabric can be applied to leather as well. Here’s my round up of leather craft tutorials – enjoy!

If you are looking to buy leather, think of upcycling old jackets, boots and purses you already have. Sometimes it’s cheaper to get something from a second hand shop as well. Otherwise, you can check out the Tandy Leather Factory. Is there a leather project that really peaks your interest?! Share your projects… because I definitely will.
by Linda | Dec 6, 2011 | my creative journal, Uncategorized
Over time I have learned what my favorite tools and materials are for this lovely art called bookbinding. I thought it would be nice to go through what I normally use when binding books and journal. Nothing really fancy here…I think we might all have these items in one form or another. I’m definitely a very DIY small-time bookbinder…

A self-healing cutting mat and cutting knives – definitely must haves in so many ways. I’ve never found a paper trimmer that I love and much prefer a mat and knife. Also, the measurements on the mat itself are very useful for lining up cuts and projects while crafting in general.

A metal ruler – metal means it will last longer and sits heavier on top of paper to prevent sliding while you cut. Love it!

Bone folder – a must for folding paper and smoothing things over. You can also use the tip to score lines in your paper as well…

Awl – for punching holes! I have a pretty small one that sometimes gives me a handache…one of these days I might invest in the Japanese screw hole punches… very cool. Just know that you need a way to pre-punch your holes.

Needles – big tapestry needles work great for sewing up books.

Linen thread – I use both waxed and unwaxed linen thread, because it’s super strong!

PVA glue – Vinavil is the brand we use here in Italy and it’s the same glue even bookbinding teachers at workshops use…so I’m cool with it! Really, just any glue will do.

Junky brushes – to brush on the glue – probably more important than the glue, because if you get a nice coat on, it’ll stick! I use hardware store brushes. If it gets junked up, I just toss them out.


Materials from paper to leather – I use all types of materials, even recycled board to create book covers and fill in the pages of my journals. It’s fun to use alternative materials actually.

Those are pretty much all the tools and materials that I use, so it’s nothing too fancy. Of course there are many other professional tools you can buy, but you certainly don’t need them to make yourself a journal to use!
Hope my list can help you get started in bookbinding and you might also like these bookbinding tutorials I’ve written:
by Linda | Dec 5, 2011 | my creative journal
I’ve noticed here on my blog that bookbinding posts have been the most popular by far. Granted, some bookbinding affiliated sites have linked over to certain posts, so it might not really represent my regular blog readers. However, I love creating my own books and journals, yet fail to share the process as much as I would like to.

At times all the ideas and thoughts get jumbled up and I find it difficult to express and organize. One big hang up is just fear, because I’m a beginner in many respects. I’m also very much self-taught and have no claim to the proper ways or professional ways of bookbinding. I don’t have a standing press. I don’t really care about the grain of my paper. I skip steps and mess around, because it make the process more fun for me.

In my effort to stop over analyzing and simply create, I’ve decided to share regardless. I’ve thought about creating a series of posts about all the different types of binding methods I use…but I kept getting hung up on the order of presentation, how NOT complete my list was, and if I was using the right names. I realize that it doesn’t matter in the end, I’ll just take it post by post…no one is expecting a course in bookbinding here! So yes, lots of book projects will be coming to the blog in no particular order or sense. It’s just what I happen to be creating.
In the past, I have already shared various bookbinding tutorials… so check them out in the meantime.
by Linda | Oct 12, 2011 | my creative journal
During my random Internet surfing one day, I came across List Girl’s post about printing your own decorative tape. We’ve all seen washi tape make a rampage on the crafting scene and they ARE oh-so cute indeed! Just not so affordable, especially if you want ALL colors and patterns. But when I saw the post, my DIY spirit had to give it a try. The mailing label stickers are a nice size, if you just want snippets for decorative purposes.
DIGITAL
First, I tried printing out some of my own digital patterns onto a sheet of mailing label stickers. Pretty easy to do and it’s cool to be able to print custom or intricate designs. However, printer ink can be costly and I was running out of ink – probably shouldn’t have printed out a whole page!

PAINT, INK, SPRAY
So then I decided to try paint for bolder color. I mixed in a lot of water with my acrylic paint and just spread it over the sticker sheet. This is probably the cheaper way to go for an entire sheet of bright color 😛 Of course, you can use inks and spray mists to create different background effects.

GLUE
I looked up some other tutorials online and realized that I could use my double stick tape, which works for creating a longer strip of design. It’s easy to glue on patterned papers. Turns out you can do this with masking tape as well, but the double stick tape makes it a super fast process.

STAMP
Then I thought to use my rubber stamps to decorate some of the painted paper. Even stamping on white sticker labels created a nice design, especially when using tape on darker papers.

MIX IT UP
My experimentations made me realize that we can use a combination of techniques to create the final design. Paint, inks and sprays are really good for creating the base color. Or you can print an intricate design or glue on materials like book paper or fabric.
Stamping or printing on top of your foundation can add more patterns and certain repeat motifs for your designs. I also tried drawing on lines with gel pens.
For little snippets of cute tape, the DIY version is actually pretty sweet looking! I also used my decorative scissors to cut the edges instead of the regular tearing method, but realized that the tearing of the tape is what makes it look more like tape. Check out all the versions I made…

If you are looking for more ideas, I’ve found some lovely sites to check out…
– TapeSwell, a whole blog about what to use your decorative tape for
– Using double-sided tape
– Use masking tape Youtube video
I’m sure there are many other ways to hack your way into pretty tape kingdom, so please feel free share in the comments below. Hope you have fun making some deco tape today. I have to say it’s pretty addictive. Enjoy!